
• Books
    • All E-Books
    • The Natural Soapmaking Book for Beginners
    • Easy Soap Making Book
  • Food
  • Soap Recipes
  • Beauty
  • Home and Garden
    • Holidays
  • Herbs and Essential Oils
  • Homestead Hop
  • Shop
  • Blog
Simple Life MomSimple Life Mom
  • Books
    • All E-Books
    • The Natural Soapmaking Book for Beginners
    • Easy Soap Making Book
  • Food
  • Soap Recipes
  • Beauty
  • Home and Garden
    • Holidays
  • Herbs and Essential Oils
  • Homestead Hop
  • Shop
  • Blog

Easy Door Draft Stopper with a Pillowcase

Posted by Kelly Crafts 23 comments
Simple Life Mom Shop - Homemade Organic Skin Care Products
Please Share

Got any old pillowcases around? I have a large closet that sits over our porch. I don’t think it has insulation, because it gets extremely cold in the winter time.  I decided to make a few door stoppers to help keep my bedroom warm.  The great news is, this DIY Door Draft Stopper project is very easy and can be adapted to any length door.

We used to live in a house that was over 100 years old.  It was beautiful; with 10 foot ceilings, amazing wood work, pocket doors, elaborate staircase….But it was cold! It was like living outside without any shelter whatsoever! Ok, maybe not that bad, but I still have a picture in my mind of my dad visiting us and sitting with shoes, sweater, blanket, etc. and shivering (He doesn’t get cold often). How did my babies survive?

Anyway, the house we live in now is nice and small (the way I like it – less work), and is pretty well insulated.  Our bedroom, however, is built above the back porch and gets colder.  The closets are NOT insulated because all the cold air seems to be coming from there.  Until we can get that fixed, I decided a DIY project was in order.

DIY Door Stoppers from pillow cases by Simple Life Mom

What You Need:

  • An Old Pillowcase (or whatever one you don’t mind cutting up)
  • Measuring tape
  • Marker
  • Sewing machine or needle and thread
  • Polyester Stuffing
  • Rice or Sand

DIY Door Draft Stopper

Step 1:

  1. Turn your pillowcase inside out so that it lays flat.
  2. Measure how wide your pillowcase is and divide by 4. For example, if your pillow case is 24 inches wide, make a mark every 6 inches so that you will have 4 strips.
  3. Mark the pillow case and cut through both top and bottom, making 4 strips.
DIY Door Draft Stoppers
Cut the pillowcase into 4 strips.

Step 2:

Sew a straight stitch up both sides (the bottom is already done).  Leave the top open for stuffing.

Step 3:

  1. Make sure your door stopper is the right length.  Mine were too long once I put two to a long door so I needed to trim them first (They don’t fold up corners well so you want to make them the right length.)
  2. Pour at least 6 cups of rice into the door stopper (if you have more, add more! You want to give it some weight so it blocks the draft better).
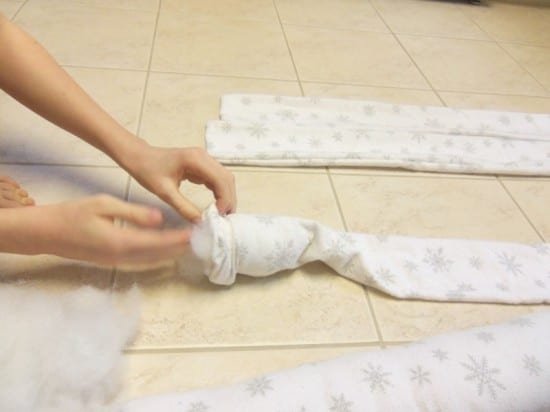
  3. Stuff with Polyester fill.
DIY Door Draft Stoppers
Fill with Polyester Fill and Rice

Step 4:

  1. Sew the Door Draft Stopper Closed.
  2. Work the rice along the bottom of the door stopper. Pull down on the bottom while pinching the polyester fill up and shake.
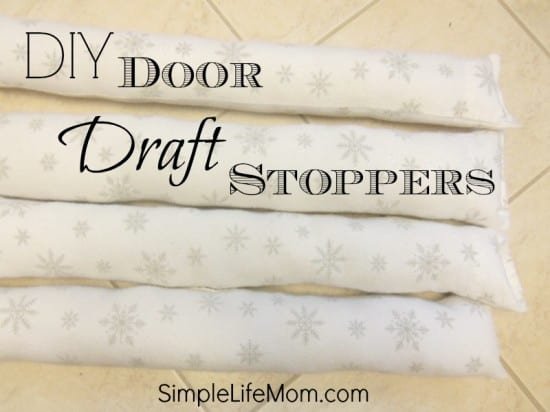
DIY Door Draft Stoppers

That’s it! I like the idea of making them whatever design that I want.  You can always add some tassels, bedazzles, or whatever you like.

If you haven’t yet, follow along with all our DIY ideas on Facebook and Pinterest.

We’d love to have you in on the conversation.


Please Share
23 comments

About Kelly

Kelly is the author of number one best seller The Natural Soap Making Book for Beginners and Easy Soap Making. She's also written multiple ebooks on herbal remedies and natural bath and body DIYs. Her journey toward better health has inspired her to make things in and around the home from scratch, start a homestead, and become more resourceful when it comes to health and home. She shares her recipes and DIYs here on Simple Life Mom and has a shop where she sells products for those who would rather buy than make (SimpleLifeMom.com/shop).

You also might be interested in

Handmade Shampoo Soap Video Tutorial from Simple Life Mom

How to Make Shampoo Soap Step by Step Video

Jul 23, 2014

Please Share I’m excited to be able to bring you[...]

Homestead Blog Hop - Homestead tips, ideas, animal care, and recipes every Wednesday

Homestead Blog Hop 609 – Homemade Mozzarella, Pickles, and Salmon

Jul 22, 2026

Please Share Welcome to Homestead Blog Hop, a weekly gathering[...]

Homestead Blog Hop - Homestead tips, ideas, animal care, and recipes every Wednesday

Homestead Blog Hop 516 – Fall Decor and Recipe Ideas

Sep 24, 2024

Please Share Welcome to the Homestead Blog Hop! Homestead Blog[...]

23 comments

Leave your reply.
  • Carol
    · Reply

    December 3, 2014 at 10:28 PM

    I think I’m going to make several of these for my windows. They are the older, top up to open kind, the ones with the weights ( but the previous owner cut all the weights out…). Anyway, mine are open to the outside at the top when closed, and in the summer, they are also open to the air… These would be perfect to put in the space between the top and bottom to close the gap!

    • Kelly
      · Reply

      Author
      December 3, 2014 at 10:31 PM

      That’s crazy. When we lived in the old house, I had to put weights in and Windows. It was a lot of work. I hope these work well for you.

  • Audrey
    · Reply

    December 5, 2014 at 3:53 PM

    We have some drafts too and this would be so easy to make (plus cuter and cheaper than the store bought ones).

    saw this on The Weekend Social

  • Brittany @ Equipping Godly Women
    · Reply

    December 8, 2014 at 8:45 AM

    You just set them in front of the door, right? They don’t go underneath the door?

    • Kelly
      · Reply

      Author
      December 8, 2014 at 12:09 PM

      Correct, in front of the door after you shut it (meaning on that side that you are on where you can make sure it gets up close and snug).

  • Lindsey
    · Reply

    December 9, 2014 at 2:56 PM

    Love this! I need to make a few of these for sure. Thanks for sharing this at the Homestead Blog Hop! 🙂

  • Sandra
    · Reply

    December 11, 2014 at 6:45 AM

    We made some of these this year. We live in an old Country Farmhouse and drafts are a part of life.
    Thanks for sharing at the HomeAcre Hop!
    Pinned to the HomeAcre faves board!

  • Bernice
    · Reply

    January 18, 2018 at 11:05 AM

    I’m making some for myself and some friends. I think i’ll make them out of my quilting stash. You can also take the filling out of old pillows.

    • Kelly
      · Reply

      Author
      January 18, 2018 at 1:26 PM

      That’s a great idea! They’re going to be on the floor anyway, so why not use old pillow stuffing. Make sure they’re weighted to your liking before sealing them up.

  • Liz
    · Reply

    February 1, 2018 at 10:33 PM

    Such an easy & smart idea! I need to make a few of these 🙂

  • Aryn @ The Frugal Virginia Farmhouse
    · Reply

    February 6, 2018 at 4:35 PM

    I love this!!! We live in a house that is over 100 years old and our front door has a massive space at the bottom of the door that lets cold air in. Further, my naughty dogs tore open a bed pillow the other day and now I have stuffing all over my spare bedroom. Solving 2 problems at once is my kind of thing!

  • Jen
    · Reply

    February 8, 2018 at 3:13 PM

    Hi there. I’m wondering if you filled the tube completely with rice/beans first then stuffed with poly fill? Or is it half and half?

    • Kelly
      · Reply

      Author
      February 8, 2018 at 10:53 PM

      I filled half with rice and then stuffed it the rest of the way with poly filling. The heavier, the better it works at staying in place and closing the gaps.

  • L J Sprute
    · Reply

    April 4, 2018 at 3:22 PM

    How do you wash them with rice or beans in them?
    I made a door stopper with muslin, then used an old towel cut into
    strips and sewed together for a removable casing. I used pine shavings
    for the filling, when it gets dirty, I removed the towel casing,
    throw it in with a load of towels. Works Great!

  • Carol
    · Reply

    September 11, 2018 at 3:16 PM

    We also need these in Florida, they keep out humidity and when we have our super windy hot days!! Ohhhh, and bugs, lol

    • Kelly
      · Reply

      Author
      September 12, 2018 at 7:17 AM

      I hadn’t thought of the heat and bugs and keeping the cool air in! Great idea.

  • Cathy
    · Reply

    June 23, 2021 at 8:09 AM

    I am designing my own sewing room (daughter married and moved out). This would be a great idea to put in the groove between my window and screen. We get lots of dust there. If I make it with a cover, then I can wash it from time to time. I can coordinate it with the room and it will look nice too.

Leave a Reply

We'd love to hear your thoughts and ideas!
Cancel Reply

Recipe Rating


Join the Simple Life Mom Community

And get a FREE Bath and Body Recipe E-Book:

Thank you!

Check your email and add me to your address list so messages don't go to spam. 

You'll have a link to the free e-book in the email.

Kelly

SHOP

Join Us and Get New DIYs and Recipes Subscribe

Categories

  • Soap Making
  • Bath and Beauty
  • Health and Essential Oils
  • Home and Garden
  • Homestead Blog Hop
  • Real Food Recipes

Books

  • Natural Soap Making Book for Beginners
  • Easy Soap Making
  • Natural Soap Making How-To and Recipe Book
  • Make it Yourself: Bath & Home DIY for Self Sustainability
  • Natural Beauty from Head to Toe
  • Herbs & Essential Oils in Soap Making

SHOP

Other Resources

  • Mountain Rose Herbs
  • Herbal Academy
  • Amazon
  • Revelation Health

© 2026 Simple Life Mom - All Rights Reserved

  • Disclaimers/Policies for Simple Life Mom

Press Enter to search · Esc to close