
• Books
    • All E-Books
    • The Natural Soapmaking Book for Beginners
    • Easy Soap Making Book
  • Food
  • Soap Recipes
  • Beauty
  • Home and Garden
    • Holidays
  • Herbs and Essential Oils
  • Homestead Hop
  • Shop
  • Blog
Simple Life MomSimple Life Mom
  • Books
    • All E-Books
    • The Natural Soapmaking Book for Beginners
    • Easy Soap Making Book
  • Food
  • Soap Recipes
  • Beauty
  • Home and Garden
    • Holidays
  • Herbs and Essential Oils
  • Homestead Hop
  • Shop
  • Blog

How to Fix Botched Soap – Hand Mill Soap Video

Posted by Kelly Handmade Soap, Soap Instructions and Ideas 35 Comments
Please Share

There are a number of reasons to hand mill soap. The biggest reason people hand mill soap is to fix botched soap and other soaping problems.

Sometimes you forget to add enough water, enough oil, or add too much lye. If you know what you did (and sometimes if you’re not quite sure) you can still fix the soap. After all, who wants to throw away all of those good ingredients?
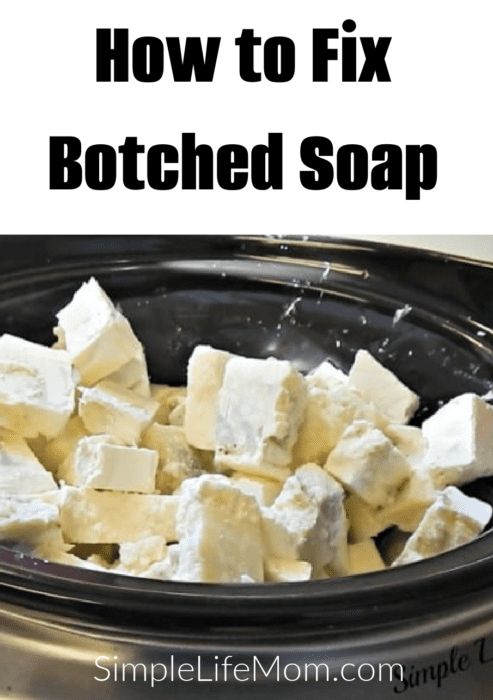
How to fix botched soap by hand milling - by Simple Life Mom

Reasons to Hand Mill Soap

There are many reasons to hand mill soap. Fixing botched soap is only one of them.

Using Soap Right Away

Some people hand mill soap right after they’ve made a cold process batch, because they like the idea of being able to use it right away.

Hot processing and hand milling increases the speed at which the soap cures by evaporating the water within the soap and making it harder faster.

While most people will tell you that lye is still finishing the process in cold process for 4-6 weeks. The real reason cold process needs to cure is to evaporate the water and allow the soap to harden. The saponification process in cold OR hot process is over from 24-48 hours after it is poured into the mold.

Fix Botched Soap

Another reason people will hand mill soap is when something goes wrong. 

Basically, never throw out a botched batch of soap.  It can almost always be fixed. 

It may not be exactly as you envisioned in the end, but you will definitely end up with a soap that is usable.  So, no waste!

Which is especially great to know if you are nervous about making soap or if you have put in a lot of expensive ingredients.

If you end up with a chalky soap that is crumbling in your hands, it could have not been insulated well enough in the first few hours, or it could be lye heavy.  Either way, you can cut the batch into pieces (like I did in the video) and make it come out wonderfully. 

If you suspect that it is lye heavy, just add a bit of oil to your batch. If you know how much lye you added, then add oils to compensate for this.

If it is messed up from seizing in the pot or not being warm or being too hot in the mold, then hand mill it and add some water. I add a few tablespoons and then seal with plastic wrap to keep the moisture in while it melts.

Draw backs?

For the same reason people like to hot process soap (the texture) and hand mill, others don’t like to.  I, personally, prefer the look of the smooth cold processed bar, but when you need to hand mill, you need to.

Please Subscribe to my YouTube Channel.

How to Hand Mill Soap Video Tutorial

YouTube player

How to Hand Mill to Fix Botched Soap

  1. Make your soap as usual, by bringing it to trace.
  2. If you have already let the bars set, that’s fine, just break them into small chunks and throw them into the crockpot.
  3. Add a touch of oil if your soap is lye heavy.  Otherwise, add a few tablespoons of water and watch it as it starts to warm.  It will become bubbly around the outside edges. Cover with plastic wrap to keep the moisture in the crockpot.
  4. Turn it on the lowest setting. You don’t have to stand over it.  You can walk away, but check back every 10-15 minutes.  When it starts to bubble, give it a stir.  You want the entire batch to get the bubbly translucent look to it.
  5. When the entire batch is translucent, you are probably done.  This should take at least 1-3 hours, depending on the heat setting of your crockpot.
  6. Add essential oils and mix.
  7. Line your mold and scoop it in.  Pat it with a spoon to get out any air bubbles.
  8. Texture the top as desired.
  9. When it is cool and hard, remove and cut.  It will continue to harden as it cools, but it can be used immediately.

If you’re looking for cold processing soap instructions see: 7 Easy Steps to Homemade Soap for Beginners

Save


Please Share
35 Comments

About Kelly

Kelly is the author of number one best seller The Natural Soap Making Book for Beginners and Easy Soap Making. She's also written multiple ebooks on herbal remedies and natural bath and body DIYs. Her journey toward better health has inspired her to make things in and around the home from scratch, start a homestead, and become more resourceful when it comes to health and home. She shares her recipes and DIYs here on Simple Life Mom and has a shop where she sells products for those who would rather buy than make (SimpleLifeMom.com/shop).

You also might be interested in

All About Wheat Flour - types, which to use when, and which flour is the healthiest

Which Flour is Best for Bread?

Jan 4, 2013

Please Share If you like to bake, then it’s important[...]

Make your own natural eyeliner from scratch! Homemade makeup really works. Here are a few eyeliner recipes to choose from. @Simplelifemom

Make Your Own Natural Eyeliner

Dec 23, 2013

Please Share You can do it! You can make your[...]

Homestead Blog Hop - Homestead tips, ideas, animal care, and recipes every Wednesday

Homestead Blog Hop 482 – Ricotta Cheese & Valentine’s Day Favors

Jan 30, 2024

Please Share How has January been treating you? It started[...]

35 Comments

Leave your reply.
  • Pure Grace Farms
    · Reply

    September 29, 2014 at 7:48 AM

    Making soap is on my list of to do’s. Thanks for the great information. When I am ready to give it a try I will know right where to come to get good information.
    Blessings,
    Shari

  • Nicky
    · Reply

    September 29, 2014 at 3:54 PM

    I’ve never made soap before. I always thought it was difficult to do. Your version looks simple and easy to do.

    • Kelly
      · Reply

      Author
      September 30, 2014 at 10:12 AM

      It is easy. It’s the process of bringing it to trace that some people get a little intimidated of, but as long as you follow directions carefully it is pretty straight forward. Like baking a cake 🙂

  • Jenna @ A Savory Feast
    · Reply

    October 1, 2014 at 2:29 PM

    I would like to make my own soap someday! There is a stand at my local farmers market that sells handmade soap and it is the best! They have some really great scents. Thanks for sharing with Hump Day Happenings.

    • Kelly
      · Reply

      Author
      October 2, 2014 at 9:15 PM

      Thanks for stopping by. Soap is one of those things that you just have to dive in and try…after doing some reading up of course 🙂 I don’t know anyone who felt ready the first time.

  • Heather @ My Overflowing Cup
    · Reply

    October 2, 2014 at 4:32 PM

    I enjoy making homemade soap, so I appreciate you sharing the way you do it. Thanks so much. Pinning this now.

  • Linda S
    · Reply

    October 6, 2014 at 2:40 PM

    I make our soap using the cold press method, but have not tried the hot press method. Something new on my to try list – thank you! And I see so many wonderful glimpses here of things I’d like to read more about, so I will definitely be back soon for a visit.
    Stopping by from Proverbs 31 link up today.

    • Kelly
      · Reply

      Author
      October 6, 2014 at 3:17 PM

      Cold process is my favorite, but there have just been those times where hot process was necessary. It still gives you a great soap, just a different texture. Glad you stopped by.

  • Raia
    · Reply

    October 9, 2014 at 3:54 PM

    I’ve never heard of making soap this way. Thanks for sharing it at Savoring Saturdays. 🙂

  • Shelley
    · Reply

    November 14, 2014 at 11:16 PM

    Hello! I just made two batches of HP soap with the same recipe. Batch 1 just would not come to trace and ended up an oily mess with granules or foamy stuff on the surface of the mess. The fats (coconut oil, olive oil and palm oil) were warm but the lye mixture was left outdoors for a bit to cool down. This is FL so it is far from cold. Barely jeans weather. Batch 2 same exact recipe came to trace, cooked up just fine and is molded.

    Ack! So mad about maybe wasting expensive ingredients. Any advise?

    Thanks!

    • Kelly
      · Reply

      Author
      November 15, 2014 at 11:12 AM

      First, were these all cold processed or hot?
      Both lye and your fats should be around 100 degrees. The lye can be a bit cooler. I’m not sure if you measured, if they were too hot….
      Sometimes there is separation because you did not stir it enough. A stick blender is the best thing to use, though hand mixers are fine too. You can do it by hand, but it tends to lose too much temp. that way.
      Another cause could be if you used a fragrance oil. Some fragrance oils tend to cause separation before you even get it out of the pot.
      NO matter the cause, I’m sure you want a solution. If this happened as you were cold processing (pouring after bringing to trace), then I would put that batch into a crock pot and cook on low. When it starts to “cook” use a hand mixer on it and make sure it is mixed super duper well! Continue to cook on very low until it starts to look like mashed potatoes. When it is all the same consistency scoop it into a mold and press into shape.
      Let me know how it goes….

  • jason
    · Reply

    March 23, 2015 at 8:48 AM

    So…. I made your butter soap using the recipe provided here on your site…. Well that was not exactly the full recipe I used… I decided that it was worth me doing 1.5 times that amount that your recipe called for. Writing everything down carefully from your recipe, I headed down to my little soap making spot in my basement.

    I used mostly white palm oil, but had some red on hand and decided to use some to color the batch, or at this point see what it would do… I made the soap, poured it into the mold, covered it to allow it to do its thing for at least a day….

    As I uncovered it, the color was that of fresh churned butter, if you have ever made your own butter from organic milk/cream, it was just that color. I get so excited over simple things that I do myself, that is just the passion coming out really….. SO anyway, I began to cut it, it crumbled and was super hard…. It crumbled like Cocoa Butter…. I knew that wasn’t right…

    Making some of your other recipes already, I knew I had to investigate a little further before I pointed my finger…. I make mistakes all the time, I realized a long time ago that it is a part of learning and self improvement…. I cut a few more pieces and the same type of cuts were happening…

    Looking over the recipe I copied down, I realized I didn’t cut back my lye by 25% after I wanted to produce a 6 pound loaf. So I put enough lye into the batch to produce a 8 pound loaf, while the rest of the recipe was correct for the 6 pound loaf I wanted to make in the first place.

    Having looked at this video, I am looking for some advice to recover it, having spent $25 to make it… I didn’t add any EO to it as you suggested, and I agree it does smell pleasant anyway. So what advice do you have? Thanks Jason

    • Kelly
      · Reply

      Author
      March 23, 2015 at 10:58 AM

      No problem. You can definitely save it. Yes, when it is crumbly like that it is usually because of being lye heavy or not being properly incubated. Since yours is lye heavy, put it in a crock pot or on the stove on the lowest setting. Add about 1/2-1 cup water. Let it set, checking for it to start melting occasionally and stir. When it’s all frothy like it shows in the video, scoop into the mold and flatten with a large spoon- add designs on top, whatever you want to do. It’s ready to use when it cools.

      • Jason
        · Reply

        March 24, 2015 at 10:47 PM

        Update: I cut the batch up, it was so crumbly/hard… I added a 3/4 cup of water at first, ended up adding 1/2 cup more. Sat in the crock for four hours, and it did begin to break down. Remolded it, didn’t scrap the sides, although it is different, the texture is much different… But I was able to save it to where it could be used… Thanks Kelly!!!!

        • Kelly - Simple Life Mom
          · Reply

          Author
          March 24, 2015 at 10:51 PM

          Yea!! It is very different, but it works.

  • Jason
    · Reply

    March 24, 2015 at 10:51 PM

    http://i608.photobucket.com/albums/tt169/modern_pioneer/Homemade%20soaps/soaps_zpssu5yskec.jpg

  • Kelly - Simple Life Mom
    · Reply

    Author
    March 24, 2015 at 10:59 PM

    Those look fabulous! Great work!

  • Jason
    · Reply

    April 23, 2015 at 6:01 PM

    Having a couple issues with some Lavender soap this past week…. Two batches went seriously wrong, make that three batches…

    1. First batch of cold processed soap was Lavender, you could hardly tell because I forgot to add the EO at light trace.
    2. Again, second batch was Lavender, you could tell because it smell like it but the color was off…
    3. Third batch smelled great, but was awfully dark in color.

    I added one third of batch number 3 to batch 1 and 2, in order to get the color correct as well as the scent. I needed to add 1/2 cup of water after I chopped both of the soaps up, even though they weren’t lye heavy. Using a potato masher, the S shaped wire kind, I got in with both elbows to mush it up. I placed it back in the mold, let it cool overnight.

    Un-molding it, I made my molds with removable ends from wood, I noticed it was a little sticky on the inside, towards the center of the loaf. I went ahead and used my cheese slicer to make the bars anyway. I was hoping that the added water would evaporate from the center where it was most sticky. Well, I added the wee little bit of water so I could mash them up into finer pieces, and it made it mushier and easier to manage.

    Using the above method as per most of your instructions, I was able to save 54-4 ounce bars of soap with a retail value of over $200… I used the crock pot again to save these batches… I was a little nervous, but bold enough to try to save it… What did I have to loose?

    This is what I learned…. Adding a little water to a batch is okay, even if it isn’t lye heavy. I added 1/2 cup to 5 pounds of soap, let it heat up for 4 hours in the crockpot ( I use a old one that was broken, fixed it for soap making ) Use a wire S shaped masher makes smaller chunks. I never did get it to go all the way mashy like mashed potatoes, but rather chunky mashed potatoes. ( maybe I did something wrong here ) but in the end I had a good looking bar of soap that had small light purple, some purple small chunks. Generally the bar turned into a lavender color with wee little chunks in it. The softer center has hardened up now, I suspect it will get harder in time..

    Looks good and now sits of the shelf for sale three days later… Thanks again and just wanted to share my experience with you and others…. Jason

    • Kelly
      · Reply

      Author
      April 23, 2015 at 6:53 PM

      Thanks for sharing your experiences Jason. It helps us all get a little more knowledgeable about making soap, especially when it comes to saving those batches!!

  • Khrista
    · Reply

    October 8, 2015 at 4:37 PM

    Hello ! My name is Khrista and i own and operate riversmeet Naturals. I make goats milk soaps and do not use lard or tallow. What i am wondering is can i use all vegetable shortening in place of the lard and/ or tallow in your recipes? You have so many wonderful recipes that i would like to try and i just love your site!Thank you for posting them and making them available to people like me! Thank you in advance for any help you may offer.
    Sincerely Khrista.

    • Kelly
      · Reply

      Author
      October 8, 2015 at 4:57 PM

      You can make a castile soap with olive oil and coconut oil. You can also substitute responsible palm oil for the coconut oil. Check out the various soap recipes on my site, I have castile, palm oil, and various shampoo bars that don’t have tallow.

  • Deb
    · Reply

    October 2, 2016 at 4:30 PM

    I’ve made several different batches of soap and am doing something wrong because I can’t get the scent of the essential oils to stay. I’m guessing it has to do the temperature at the time they are added. Let me know what your thoughts are.
    Thanks.

    • Kelly
      · Reply

      Author
      October 2, 2016 at 5:04 PM

      First, when hot processing soap it’s best to add essential oils at the last second. Yes, they are mostly stream distilled and are good at moderately high temps., but they seem to last longer when added last.
      Secondly, essential oils are divided into notes: base, middle, top. Some scents our brain identifies quickly (top), but we quickly lose the ability to smell them (why you get used to a smell and don’t smell it any more when people who just walk in do). If you are using to notes only thirty will seem to fade quickly. Citruses can be difficult.
      Third, make sure you’re adding enough for the size of the batch. I add 3 oz to a 36 bar batch (9lb). That’s a lot and my bars are only lightly scented.

  • Melanie
    · Reply

    January 26, 2017 at 8:24 PM

    So. I tried my very first batch today. I kept testing it. The only method I knew of was to touch it to my tongue, check for the tingle. So it seemed to continue to tingle. So I kept it processing. Then I got nervous as it seemed to get dry. So I put it in the mold. Well. I tried it out and it has a slight burning still. ? It still seems on the drier side. I’m not thrilled. Can I fix? This was supposed to be a rich coconut oil soap. Looking forward to your reply.
    Mel in Michigan.

    • Kelly
      · Reply

      Author
      January 26, 2017 at 8:38 PM

      You can put it back in your slow cooker and add a little bit of water (1/4 cup? at a time, depending on the size of your batch). I’ve had the same experience with a lye heavy batch, added more water and cooked it very very slowly, after it all changes to a different texture (mashed potatoes) I scooped it into the mold and it was great. Give it 24 hours to set then test it.

  • Ellen
    · Reply

    November 11, 2017 at 10:10 PM

    Can my crockpot be used after this for food or should i use one that is specifically for soap?

    • Kelly
      · Reply

      Author
      November 11, 2017 at 10:32 PM

      Use it again for food. It will be just like using dish soap in a dish before using after everything is processed. Just rinse really well.

  • magda
    · Reply

    March 17, 2021 at 3:34 AM

    hallo I whould love to make 100%olive oil soap. in the cold process it whould take year to cure(info from internet) so I wonder how about hot process making, can you walk me tru please 1000grams of olive oil what amount of lye water I need please. how long will take to get trace and how long to cooking time? any advice will be highly appreciated. thank you. I am crazy mad for 1 oil soap 100%olive oil, I whould really like to do it.

    • Kelly
      · Reply

      Author
      March 22, 2021 at 10:33 PM

      You can use a soap calculator to get all the information you need if you’re designing your own recipe.

  • Sherry
    · Reply

    December 6, 2021 at 11:04 AM

    Can you hot process salt soap?
    Thanks.

    • Kelly
      · Reply

      Author
      December 6, 2021 at 7:08 PM

      Yes, just follow the steps after pouring to remove from the mold before they become too hard and crumbly.

  • Melissa Coppedge
    · Reply

    August 12, 2026 at 11:59 AM

    I have your book Natural Soapmaking Book for Beginners. I also found it hard to find a simple source of information on getting started, so I really appreciate you publishing this book.

    I have tried 19 recipes thus far (some multiple times) since March of 2024. I primarily make the soap for special gifts and for the house. I love using soaps I know don’t have a bunch of chemicals in them. When I ask family if they are OK with the soaps or prefer some other gift, they all say they want me to keep giving soap. So, I must be doing something right!

    I looked at the Q&As for problems and fails, but not sure any of those I saw applied to my situations.

    I have experienced two things more than once.

    1) When I use a hard oil like cocoa butter or shea butter, it sometimes forms a crust on the bottom of the pot during the cooling process, even if I make a point of occasionally stirring it while cooling. I usually scrape it off the bottom and make sure to mix it well with my immersion blender. Is this normal? Am I doing something wrong? Is it the type of cocoa or shea butter I am using?

    2) When I make the Pumpkin Spice Recipe, the base oils leak out and make a mess. I have not had this problem with any other recipe to date. I use canned pumpkin with no added ingredients. I have used all the base oils in other recipes, so I don’t think it is the brand or type of the base oils. But it doesn’t seem like pumpkin puree should be that oily.

    Thank you for any advice or direction you can provide.

    Melissa

    • Kelly
      · Reply

      Author
      August 18, 2026 at 8:36 AM

      Hi Melissa, to answer your first question, yes it’s normal for the heavier oils to sink to the bottom before adding the lye water. Just use the immersion blender for a few seconds and it will stir them well. The pumpkin puree releases a LOT of glycerin. It seems to be a chemical reaction. It’s fine though. It will still dry and end up being a great soap.

Leave a Reply

We'd love to hear your thoughts and ideas!
Cancel Reply

Recipe Rating


Join the Simple Life Mom Community

And get a FREE Bath and Body Recipe E-Book:

Thank you!

Check your email and add me to your address list so messages don't go to spam. 

You'll have a link to the free e-book in the email.

Kelly

SHOP

Join Us and Get New DIYs and Recipes Subscribe

Categories

  • Soap Making
  • Bath and Beauty
  • Health and Essential Oils
  • Home and Garden
  • Homestead Blog Hop
  • Real Food Recipes

Books

  • Natural Soap Making Book for Beginners
  • Easy Soap Making
  • Natural Soap Making How-To and Recipe Book
  • Make it Yourself: Bath & Home DIY for Self Sustainability
  • Natural Beauty from Head to Toe
  • Herbs & Essential Oils in Soap Making

SHOP

Other Resources

  • Mountain Rose Herbs
  • Herbal Academy
  • Amazon
  • Revelation Health

© 2026 Simple Life Mom - All Rights Reserved

  • Disclaimers/Policies for Simple Life Mom

Press Enter to search · Esc to close