Adding little flares and decorations to your soap making can give your projects that special touch that shows your personality; like pencil line soap!
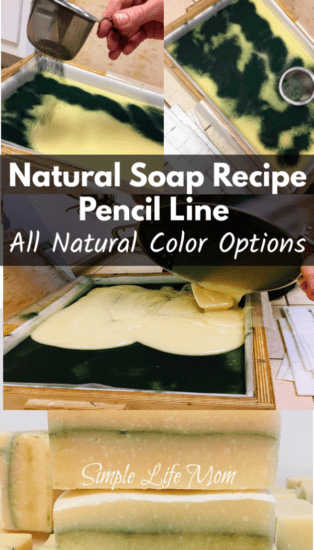
It can also be very exciting to try something new within your designs and accomplish something beautiful that you’ve never tried before.
Adding a pencil line to any soap is actually super easy
- There are so many natural powders to choose from, meaning lots of color options.
- It’s a quick and easy method.
- You don’t have to rush like a maniac before your soap sets up (usually).
Pencil Line Soap
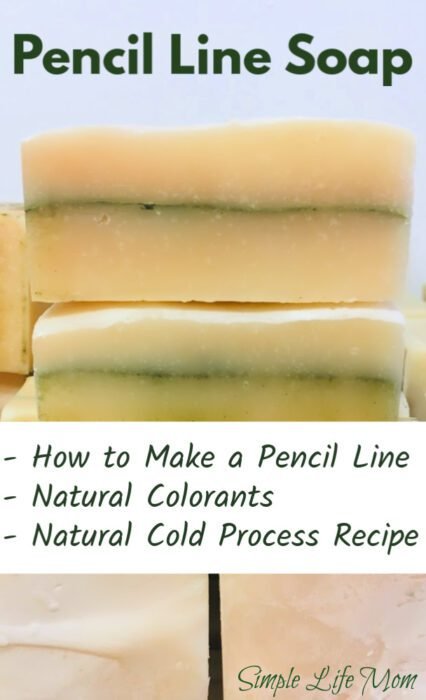
A pencil line in soap is a small line of a different color that is usually in the middle of a soap bar. You can add one line or even multiple lines. The line can come in-between the same two colors, or it can be used as a divider between different color gradients.
You can add a pencil line to cold process, hot process, and even melt and pour soap projects. So, whichever method is your favorite, you can make a pencil line.
Pencil Line Soap Colors
Here’s the big deal: color!
Which powders can you use? As long as they are natural, most powders will work great. The main thing you want to know head of time is whether that powder will change color when immersed in heat and cold process.
For example, beet root is such a beautiful pink color that it’s surprising that it turns brown within soap. If you want a pink color, you should choose instead a powder like madder root or rose clay.
Here are some color guides to get you going:
Pencil Line Color Guide
Grey: betonite clay, activated charcoal
Black: activated charcoal
Brown: cocoa powder, Turmeric powder
Yellow/Orange: anatto powder, Moroccan Clay, Turmeric Powder
Pink: rose clay, madder root powder
Purple: Alkanet Root
Green: alfalfa powder, spirulina powder
Blue: activated indigo powder
How to Make a Pencil Line
As mentioned above, the easiest way to make a pencil line is with a powder.
The easiest way to avoid chunks is to find a very fine mesh sieve. A tea strainer can work. Mine should be finer, but I make do.
1. Decide where you want your pencil line and how many.
Do you want one pencil line? Two? Three? Decide how many you want and if you want them all one color or multiple colors.
Do you want it near one end of the bar, in the middle?
2. Decide if you want it straight or jagged.
This comes down to soaping skills, but you can get a pretty straight line by making sure you soap is thin enough when you pour your first layer and thick enough when you add you second.
In other words, pouring the first layer of soap when it is at a thinner trace will allow it to really settle into the mold in a flat line. Then you can take your time and add your pencil line material and then blend to a thicker trace your top layer so that when you pour it on, the bottom layer should also be thicker by this time and everything settles into place nicely. Too thin and they mix together. Too thick and it’s really hard to get it flat.
If you want mountains or jagged peaks around your pencil line, then mix your soap to a thicker trace before adding half to your mold. Shape with a spatula and then add your pencil line material and your top layer of soap.
Obviously these instructions change a little if you’re adding multiple lines.
3. Make soap.
Ok, so you need to make a batch of soap for your pencil line soap. I like to use a good tallow, coconut, olive oil soap for projects like this so that it thickens at a nice, comfortable rate so there’s no rushing. Less can go wrong and you end up with an amazing soap that doesn’t dry out your skin and is very nourishing.
I’ve provided you with a recipe that makes 12 bars at 4 ounces each. When it gets to the right trace consistency you’ll pour half into your prepared mold (1/3 if you’r making 2 lines, 1/4 if you’re making 3 lines, etc.).
Versatile Soap Recipe
I call this my versatile soap recipe because I feel like you can take it, tweak it, and add or do almost anything with it. And it makes a fabulous bar.
12 bars – 4 ounces each – 5% superfat
Ingredients:
- 12 ounces tallow or lard
- 11 ounces olive oil
- 10 ounces coconut oil
- 12 ounces water
- 4.5 ounces lye
- 1 ounce essential oil
- pencil line powder of choice
Directions:
- Weigh and then combine tallow (or lard), olive oil, and coconut oil in a large pot and heat until melted and combined. Allow to cool to 100-110 degrees F.
- Weigh lye and water. Go outside and, while wearing all safety gear, add lye to water and stir until dissolved. Do not touch or breathe in the gas it gives off (gas dissipates around 60 seconds). Allow to cool to 100 degrees F.
- While those are cooling, prepare your mold. Line if necessary.
- When fats and lye water is cooled, pour lye water into pot of oils. Mix with a hand mixer or stick blender on and off until light trace.
- Add essential oil and blend.
- If you want to form peaks then mix until thicker trace. Otherwise, add the portion you decided on into your prepared mold. 1/2 for one line in the middle, 1/4 for for 3 lines, etc.
- While holding the strainer or sieve above the poured soap, tap into the strainer the powder of choice. Shake evenly over the soap in a thin layer.
- The next layer of soap should be thick enough to not sink into the lower layer. Pour onto a spatula to help guide it onto the lower layer. Repeat, depending on how many lines you are making.
- Cover and insulate for 24 hours. Cut and cure for 4-6 weeks.
Tips for Pencil Line Soap
There are a couple of things that you may not think of until you’re in the middle of it all.
1. Blurred Lines
If you have a mold that has dividers that you push into the soap right after pouring, then your pencil line will be blurred. This can be remedied by taking a potato peeler and gently shaving off the smudge lines after curing.
In my batch in the picture I actually wanted the blend mark (I think it looks like a melting color into the bottom layer and really like it). But I also show you what it looks like in the picture when you shave off the blend. It just depends on what you want.
If you cut and have the same issue, know that a gentle shave after it hardens is super easy.
2. Clumps
It’s really hard to not have thicker areas when you are sifting the powder over your soap. Don’t be afraid to blow on it to spread it out a bit. Just be careful as it may go all over your kitchen. You should be able to give a few quick blows to spread out a clump though.
3. Other Types of Soap Making
Use this same method in any soap making method: hot process, cold process, or melt and pour.
If you love to melt and pour and want to make a pencil line, go for it! Just melt the soap and pour as you would if making from scratch. Add you pencil line between layers.
If you want to hot process, then the same principles apply. When it’s ready, scoop out a portion of the soap, even it out or create peaks (whatever look you want), add your pencil line, and repeat as desired.



5 Comments
Leave your reply.