
• Books
    • All E-Books
    • The Natural Soapmaking Book for Beginners
    • Easy Soap Making Book
  • Food
  • Soap Recipes
  • Beauty
  • Home and Garden
    • Holidays
  • Herbs and Essential Oils
  • Homestead Hop
  • Shop
  • Blog
Simple Life MomSimple Life Mom
  • Books
    • All E-Books
    • The Natural Soapmaking Book for Beginners
    • Easy Soap Making Book
  • Food
  • Soap Recipes
  • Beauty
  • Home and Garden
    • Holidays
  • Herbs and Essential Oils
  • Homestead Hop
  • Shop
  • Blog

How to Make Kombucha – Easy Step by Step Instructions

Posted by Kelly Homemade Drinks, Natural Health 42 comments
Please Share

Kombucha has many amazing benefits for the body. I went into detail about these benefits in 8 Benefits of Kombucha Tea. It is a fermented tea that is full of probiotics (those good gut bacteria), vitamins, and minerals. Make sure you read all about it. You need to know how to make Kombucha so you can make your own. Knowing the benefits brings a lot of motivation. And it’s easy!
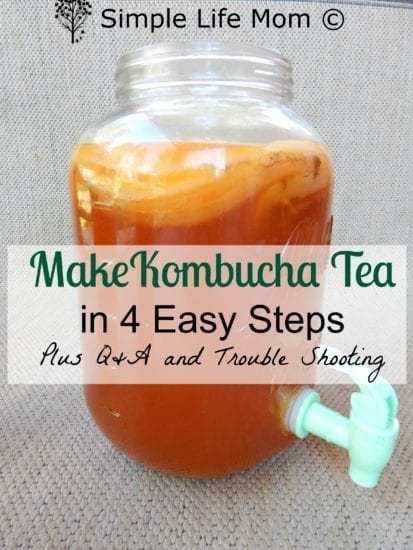
How to Make Kombucha Tea in 4 Easy Steps. Get probiotics,, vitamins, and minerals for a better natual healthy gut from Simple Life Mom

Making your own Kombucha is basically like making sweet tea. The wonderful part of it is that the bacteria/yeast growth within the tea (the “SCOBY” that grows on top) will eat all of the sugar so that this ends up being a healthy, fermented sugar free drink.

Ingredients Needed

You don’t need very much to brew your own kombucha. Once you get comfortable, you can add all kinds of extras in your second fermentation (more on that later), but as a starter, you really only need the following for basic kombucha:

  1. Organic Black Tea
  2. Non-Bleached Cane Sugar
  3. Filtered Water
  4. One SCOBY

Most of those ingredients are easy to come by and they’re not complicated. Sweet tea with a scoby 🙂

You can obtain a SCOBY three different ways

You may feel a little lost when it comes to the SCOBY. SCOBY stands for: Symbiotic Culture of Bacteria and Yeast. It’s what grows in the sweet tea because of the fermentation process. It’s not slimy, and is surprisingly firm. You WILL need to get one or develop one to make kombucha. Here are 3 ways:

  1. Use a bottle of Raw Organic Kombucha as a starter. Make the Sweet recipe below and add the bottle of kombucha. Cover with a thin cloth that will allow air to get to the tea.  You should start to see a film develop over the top in 2-4 weeks. After 4 weeks, add a half cup of sugar and stir until dissolved. Allow to grow a few millimeters thick. Use this as your SCOBY and starter to start a new batch as described below.
  2. Find a friend who has one. You’d be surprised at how has one at home and just hasn’t brought it up before. The SCOBYs are always growing and needing to be divided, so they should definitely be able to share within a few weeks of you asking them.
  3. You can purchase a dehydrated SCOBY starter and kit from stores like Cultures for Health. I’ve purchased Kefir starters from them and am very happy with their products and service.

Materials Needed

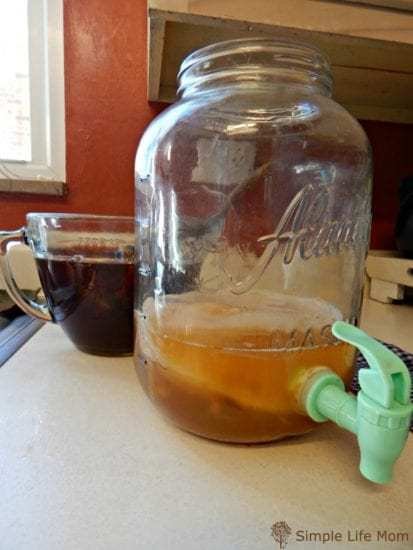
  1. One Gallon glass jug with wide mouth for Kombucha. A valve is nice, but not necessary since it just gets clogged anyway. Metal (especially aluminum) can hurt the SCOBY so use glass and wooden materials.
  2. Measuring Cup
  3. Large jug to make Iced Tea
  4. Wooden Spoon
  5. 12-16oz glass bottles that seal
How to Make Kombucha Tea in 4 Easy Steps. Get probiotics,, vitamins, and minerals for a better natural healthy gut from Simple Life Mom

How to Make Kombucha: Step by Step

Step 1: Make Iced Tea

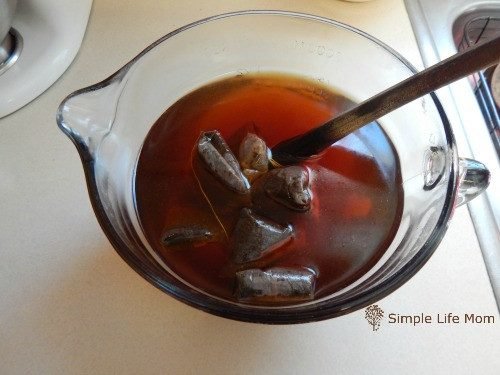
I like to use a large 14 cup glass measuring glass to make my iced tea, but you can use a large jug a well.

  • Pour hot water over 8 tea bags (or use 8 Tablespoons of tea).
  • Add 1 cup of organic cane sugar
  • Stir until dissolved and allow to cool to room temperature. This is very important. You can hurt the SCOBY by adding hot water to it or the starter.
How to Make Kombucha Tea in 4 Easy Steps. Get probiotics,, vitamins, and minerals for a better natural healthy gut from Simple Life Mom

Step 2: Ferment

  • Add room temperature sweet Iced tea to 2 cups of starter liquid and SCOBY.
  • Cover with a thin cloth. I use a thin cloth napkin.
  • Allow to ferment for 7-30 days. That’s a big time frame, but that’s because temperature matters. The warmer your home is, the faster it will ferment. Taste it after 7 days. Does it taste different than normal iced tea? Can it ferment more (and you still want to drink it)? The longer you leave it, the more like apple cider vinegar it will get. You need to find your sweet spot.

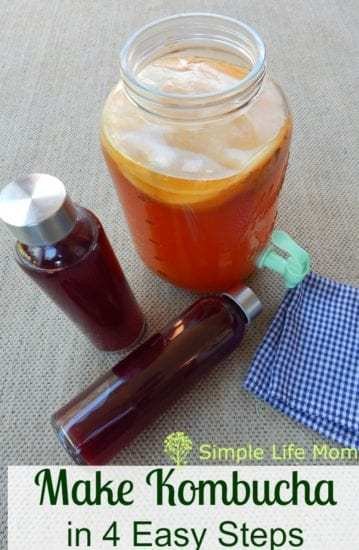
Step 3: Bottle and Drink, or 2nd Fermentation

  • Once it is as fermented as you wish, it’s time to bottle.
    • IMPORTANT: Always leave a 2in head space in your bottles (don’t fill to the top). My current bottles don’t seal very well so I don’t get a lot of fizz, but I’ve heard a lot of stories of exploding bottles.
    • Leave 2 cups of kombucha with your SCOBY as a starter (don’t bottle it all).  You’ll use it to get your next batch started later.
  • You have 3 choices.
    1. You can bottle it and put it in the fridge so that the cold causes the fermentation to stop. It will still build a little carbonation over time if you have a good seal on the bottles.
    2. You can leave it on the counter top for 2-3 days so it continues to ferment and build up strong carbonation in the bottle.
    3. OR you can put the kombucha in bottles and add juice or herbs of your choice. As a beginner, I suggest that you start with a juice like grape or a combination of berry juices or mango pineapple.
      • A good ratio in the bottle is 80% kombucha, 20% juice.
      • Now that you’ve added a bunch of sugar, you’ll need to let it sit on your counter top for 2-3 days so that it the cultures within the kombucha can eat the sugars in the juice. It will maintain the fruity flavor, but lose the impact that the sugar would otherwise give you. It will also build carbonation.
How to Make Kombucha Tea in 4 Easy Steps. Get probiotics,, vitamins, and minerals for a better natural healthy gut from Simple Life Mom

Step 4: Getting Another Batch Started

Make the sweet tea as you did before and allow it to cool to room temperature.  Pour it into your jug with starter and SCOBY and start all over again. Mark on your calendar when you started your new batch to help you remember how long it’s been fermenting. The longer the better, but if no one’s going to drink it, then less fermentation is better.

How to Make Kombucha Tea in 4 Easy Steps. Get probiotics,, vitamins, and minerals for a better natual healthy gut from Simple Life Mom
Pin Recipe Print Recipe
5 from 4 votes

How to Make Kombucha

Kombucha is a very healthy fermented sweet tea.
Course: Drinks
Servings: 1 Gallon
Author: Kelly – Simple Life Mom

Equipment

  • 1 gallon glass container
  • 1 measuring cups

Ingredients

  • 1 gallon water
  • 8 bags organic black tea
  • 1 cup granulated sugar
  • 2 cups starter tea , or acv or bottle of store bought kombucha

Instructions

  • Boil around 10 cups of water (exact amount is not necessary at this point).
    1 gallon water
  • Add 8 tea bags and sugar and stir until dissolved and tea is strong. Allow to cool to room temperature (important).
    8 bags organic black tea, 1 cup granulated sugar
  • Add room temperature sweet tea to 1 gallon jug with 2 cups starter kombucha and SCOBY.
    2 cups starter tea
  • Cover with a thin cloth so air can reach kombucha.
  • Allow to ferment for 7-30 days. Taste after 7 days and ferment to your liking (The longer, the more probiotics. But if no one can drink it because it’s like vinegar, then it’s not worth fermenting that long.)
  • Bottle, leaving 2 in head space so bottles don’t build carbonation and break, and refrigerate. If you’d like to build more carbonation, leave sealed on counter top for 2-3 days before refrigerating.

Only 4 Steps? That’s it. Sweet tea, fermented, bottled, fermented again with juice and drink! Enjoy.

Q &A

Do I need to clean the Gallon Jug each time?

No. It’s just recommended to clean it every few months. Just put the scoby and starter in another container. Be careful to wash your hands well before touching the scoby.

My SCOBY is getting huge and taking over the jug. What do I do?

Your SCOBY will continue to grow, adding layer after layer. It’s actually easy to peel these layers apart, leaving only one on in your gallon jug. Wash your hands carefully so that you do not introduce germs. put the SCOBY peels in your compost, share them with others, or throw them away.

I’m seeing colors in the Kombucha. Is it mold?

As the new layer forms on the surface of the tea, you will see multiple milky colors. In all of my experience, the only thing you need to worry about is if there are black spots or any kind of fuzz. Otherwise, you will see colors as the light hits the forming SCOBY.

Let me know if I missed anything. I’m happy to answer any questions.


Please Share
42 comments

About Kelly

Kelly is the author of number one best seller The Natural Soap Making Book for Beginners and Easy Soap Making. She's also written multiple ebooks on herbal remedies and natural bath and body DIYs. Her journey toward better health has inspired her to make things in and around the home from scratch, start a homestead, and become more resourceful when it comes to health and home. She shares her recipes and DIYs here on Simple Life Mom and has a shop where she sells products for those who would rather buy than make (SimpleLifeMom.com/shop).

You also might be interested in

How to Make Homemade Butter Recipe and Video

How to Make Homemade Butter Recipe and Video

Jul 15, 2022

Please Share Interestingly, my kids learned how to make homemade[...]

Handmade Shampoo Soap Video Tutorial from Simple Life Mom

How to Make Shampoo Soap Step by Step Video

Jul 23, 2014

Please Share I’m excited to be able to bring you[...]

How to Achieve Natural Beauty - 6 steps to a healthier more beautiful you

How to Achieve Natural Beauty

Aug 25, 2014

Please Share These 6 steps to learning how to switch[...]

42 comments

Leave your reply.
  • Carol L
    · Reply

    May 4, 2017 at 6:16 PM

    5 stars
    Just FYI: I tried to make Kombucha, but mold formed the three times I tried it. I did it in the winter, when my oil furnace was on, and it is basically open to the outside allowing mold spores into the house (built in 1945, and not well, with many large and I mean LARGE cracks that allow weather and air into the house). I was told that using a dehydrated Scoby (like Cultures for Health sells) isn’t always the best and that mold can become part of the dehydrated scoby. I was told to try a hydrated one, that requires NO re-hydrating and that might help produce a Kombucha without mold forming. I have found a hydrated scoby, and plan to try again this summer, when, hopefully, mold spores aren’t as common or ‘active’.

    • Kelly
      · Reply

      Author
      May 10, 2017 at 5:41 PM

      Interesting Carol. I know a lot of people who have used both hydrated and non-hydrated to get started and no-one has ever had mold. Make sure everything you have is sterilized before you begin, always wash your hands when pouring or touching the scoby, and make sure to cover with a light cloth.

  • merle
    · Reply

    May 10, 2017 at 7:20 AM

    Is there any way I can start a SCOBY of my own at home?

    • Kelly
      · Reply

      Author
      May 10, 2017 at 5:40 PM

      Yes, check out the 3 methods for acquiring a SCOBY above.

  • Liz Martin
    · Reply

    May 16, 2017 at 9:07 PM

    Thank you for the easy to follow instructions, I have been wanting to try making kombucha but it always intimidated me!

  • MEREDITH DELL
    · Reply

    November 21, 2017 at 12:15 PM

    I am going to use a bottle of kombucha from the store is it ok if it is flavored? Does that mean the only flavor I can have is the first flavor? It is a coconut lime kombucha.
    Thanks

    • Kelly
      · Reply

      Author
      November 21, 2017 at 7:17 PM

      It’s better if it isn’t flavored because sometimes the additions can cause some issues with the brewing. I’ve done it before with success though, so you can give it a try if it’s what you have. It will be diluted and then less and less per batch.

  • Billy
    · Reply

    November 22, 2017 at 1:05 PM

    5 stars
    Thank you for such an informative guide on kombucha Kelly! I’ve been sort of intimidated when it comes to starting my own brew but I think now is the time! Can’t wait to try it at home!

  • Regina
    · Reply

    February 14, 2018 at 11:13 PM

    I don’t know if after the tea has cooled, I should leave the tea bags or loose tea in the jar with the sugar and the scoby to ferment.

    • Kelly
      · Reply

      Author
      February 15, 2018 at 8:13 AM

      Remove the tea bags and discard after the tea cools.

  • Rob
    · Reply

    March 4, 2018 at 9:16 AM

    What does the “black” spots mean if it forms? I have some forming on the sides of my SCOBY. Should I be worried and what should I do about it?
    Thanks!
    Rob

    • Kelly
      · Reply

      Author
      March 4, 2018 at 9:30 PM

      That does sound like mold. I would start over. Is there a scoby section that you can remove that has no spots?

    • Jeanne
      · Reply

      June 24, 2020 at 7:19 AM

      It may just be yeast forming. Mold will appear dry and fuzzy.
      Helpful videos online will show the difference.

  • Joni
    · Reply

    March 9, 2018 at 5:00 PM

    A friend gave me a scobi, but not sure what a started is? Is this something besides the scobi?

    • Kelly
      · Reply

      Author
      March 9, 2018 at 5:28 PM

      A starter is kombucha. You can buy a bottle of plain, pure kombucha as a starter, but if you don’t you can still get going with your Scoby and iced tea. It will just take longer for your first batch to ferment.

  • Lesley
    · Reply

    July 9, 2018 at 8:23 AM

    Hi Kelly,

    Thank you so much for your informative site. I got a Scoby from a friend and then he gave me his as no one can drink it in their house. His one has already taken shape of the 5l bucket I bought for it and has several layers to it. I am not sure how to separate them and will then have more buckets on the kitchen shelves. 🙂
    Regards Lesley

    • Kelly
      · Reply

      Author
      July 10, 2018 at 10:24 AM

      Just grab and layer and pull 🙂 The layers pull apart pretty easily. I always thin mine down to about an inch. Compost the rest. A new scoby will form to the size of the container you have a well.

  • Dave
    · Reply

    July 9, 2018 at 7:10 PM

    My scoby keeps sinking to the bottom of my jar when I place it in the tea. Is that ok?

    • Kelly
      · Reply

      Author
      July 10, 2018 at 10:18 AM

      Is it super thick? You can peel layers off and it should be thin enough that it floats at least at an angle. I pour tea into my starter and scoby and it never lays across the top perfectly, but it is not fully on the bottom either, just crooked.

  • Holly S
    · Reply

    July 27, 2018 at 10:38 PM

    5 stars
    Have you ever tried to make Mead from your kombucha tea?

    • Kelly
      · Reply

      Author
      July 30, 2018 at 3:41 PM

      I have not…

  • J
    · Reply

    November 10, 2018 at 5:37 PM

    How long should I leave the tea bags in the hot water for?

    • Kelly
      · Reply

      Author
      November 12, 2018 at 11:26 AM

      I just leave mine until it cools, but 10 minutes is long enough.

  • Kay
    · Reply

    March 7, 2019 at 3:01 AM

    Can you use honey instead of the sugar?

    • Kelly
      · Reply

      Author
      March 9, 2019 at 4:47 PM

      Yes you can use honey. Raw honey does have it’s own bacteria culture, which can effect the brew, so you’ll have to keep an eye on it, but I know many people who love to use honey instead of sugar cane.

  • Keryl
    · Reply

    June 20, 2019 at 7:40 AM

    Hi, when you peel a thick scoby and separate them which layer do you keep the top or the bottom. Which is the mother and the baby?
    Keryl

    • Kelly
      · Reply

      Author
      June 24, 2019 at 1:16 PM

      It really doesn’t matter. I usually keep the lower part because it wasn’t in the air where sometimes other things can grow on it.

  • Cindy
    · Reply

    July 21, 2019 at 3:33 PM

    5 stars
    Can Monkfruit be used in place of cane sugar?

    • Kelly
      · Reply

      Author
      July 22, 2019 at 8:19 AM

      Monk fruit, like stevia, is mostly found in the store in its artificial form (even if it says in the raw, etc. After all, stevia is very green and is sold as white because it’s been so overly processed with chemicals that it’s only a hint of its natural self).
      Using sugars can harm the batch through starving it or feeding it too much because it’s harder to give it what it needs. You can definitely give it a try though.
      Just know that almost all of the sugar is completely consumed during fermentation. This means using regular sugar will not harm your diet if you are on a non sugar diet.

  • Megan
    · Reply

    July 21, 2019 at 7:25 PM

    I have a question, I wasn’t thinking and closed the lid on my kombucha jug rather than covering with a thin cloth. It’s been about 6 days. It looks okay but wondering if I just ruined it.

    • Kelly
      · Reply

      Author
      July 22, 2019 at 8:09 AM

      It should be fine. Once it already has the bacteria/yeast combo growing inside, closing the lid mainly just runs the risk of explosion.

  • Angela
    · Reply

    August 18, 2019 at 8:40 PM

    I received a Scoby from a friend in a jar with some liquid from her scoby hotel. Is this what I use as a starter? Or do I just start from scratch with sweet tea and the scoby?

    • Kelly
      · Reply

      Author
      August 20, 2019 at 10:58 AM

      You use the liquid that’s left in the jar as your starter along with the scoby.

  • Bethany Eisinger
    · Reply

    April 9, 2022 at 8:41 PM

    I have the same dispenser pictures in your photos. Once the tea has fermented with the Scoby for 7-30 days, can I let it carbonate for a few days in that dispenser?

    • Kelly
      · Reply

      Author
      April 13, 2022 at 8:51 PM

      It doesn’t seal well enough to create carbonation. You really need a rubber seal to make that happen. I’ve since changed to a different container without a spigot. It kept getting clogged. I then pour into bottles with a seal.

Leave a Reply

We'd love to hear your thoughts and ideas!
Cancel Reply

Recipe Rating


Join the Simple Life Mom Community

And get a FREE Bath and Body Recipe E-Book:

Thank you!

Check your email and add me to your address list so messages don't go to spam. 

You'll have a link to the free e-book in the email.

Kelly

SHOP

Join Us and Get New DIYs and Recipes Subscribe

Categories

  • Soap Making
  • Bath and Beauty
  • Health and Essential Oils
  • Home and Garden
  • Homestead Blog Hop
  • Real Food Recipes

Books

  • Natural Soap Making Book for Beginners
  • Easy Soap Making
  • Natural Soap Making How-To and Recipe Book
  • Make it Yourself: Bath & Home DIY for Self Sustainability
  • Natural Beauty from Head to Toe
  • Herbs & Essential Oils in Soap Making

SHOP

Other Resources

  • Mountain Rose Herbs
  • Herbal Academy
  • Amazon
  • Revelation Health

© 2026 Simple Life Mom - All Rights Reserved

  • Disclaimers/Policies for Simple Life Mom

Press Enter to search · Esc to close